By learning how to use the VLC media player to crop videos, you’ll unlock the ability to cut out certain areas of a video, such as the edges or borders, or zoom in by cropping. You’ll be able to remove unwanted display areas, resize the video to your liking, and even improve quality by zooming in on a particular part of a video.
Important: The way cropping works in VLC is not particularly intuitive, but it does get the job done conveniently and for free. You’ll be forced to type in the pixel values (as opposed to dragging and stretching out a video to crop or resize it).
Unfortunately, it’s not done through an intuitive click & drag of your mouse or trackpad, which is a feature advanced powerful video players (Mac) and video editing softwares typically have to make it easier and faster to crop.
This post I’ll explain how you can crop a video in VLC media player on both Windows and Mac. I’ll also cover how you can save the video after you crop it. Each step will be covered based on the operating system, as well as alternative cropping options
Related: How to Merge Videos in VLC (Windows & Mac)
Key Takeaways
- In order to crop a video and save it using VLC, you’ll need to open your your video in VLC, then navigate to the filters option (different on Mac vs Windows) and find the crop add feature.
- It is easier to save a cropped video in the Windows version of VLC, then it is on Mac. This is because copping a video and saving a cropped video using VLC require two very different processes and menus.
- Cropping a video with the goal of saving it is far easier in QuickTime or via a native screen recording tool. The steps to crop and save in VLC are more much more time consuming.
To make the process easier, you may want to use the hotkeys mentioned in this guide as there are many different menus you’ll need to find, click, and sort through in order to crop videos in VLC properly.
- Key Takeaways
- How to crop a video in VLC (Windows)
- Saving a cropped video in VLC on Windows
- How to crop a video in VLC on Mac
- Saving a cropped video in VLC on Mac
- What folder does a cropped video in VLC save to on Windows?
- Where does a cropped video in VLC save to on Mac?
- How to accurately estimate how many pixels to crop from a video in VLC
- Can you Crop video using VLC on iPhone, android
- Can you crop a video with Audio in VLC?
- How to convert a video to another video format after you convert it?
- Alternate ways to Crop a video instead of using VLC
- Differences between cropping videos on Mac vs. PC versions of VLC?
- Can you Screen shot in VLC?
- FAQ
Also see: How to Cleanly Rip a DVD with VLC (& Fix any Ripping Errors)
How to crop a video in VLC (Windows)
We’ll cover how to crop a video in VLC on Windows below. You can use this on any Laptop that runs Windows 10 or later.
Step 1: Launch VLC and open your video file (Hold Ctrl + O or click Open file)
After opening the video, You can take a visual estimate on what areas you want to crop. for example you may only want to remove a bit from the top right area of the video or maybe just the bottom.
- Keep in mind that this removes the pixels outside the areas that you’re cropping, and this does not transform, rotate or flip videos in VLC.
- It also will not trim, cut the videos in VLC, as these are different processes.
Step 2: Open the Effects and filters dashboard by pressing Ctrl + E (or via the tools menu)
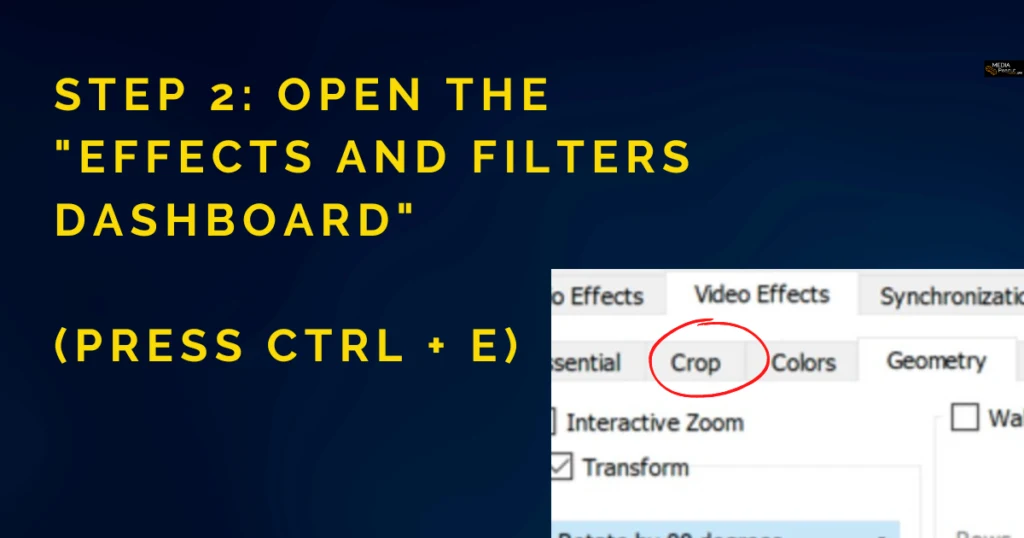
You can open the effects and filters dashboard which is a dashboard with different tabs on it. You’ll choose the video effects tab and under this, you’ll see ‘crop’ is the second tab in from the left.
You need to choose this tab to bring up the official VLC crop menu.
Related: Capture youtube videos using VLC
Step 3: Select crop and choose the pixel amount you want to crop out on each side
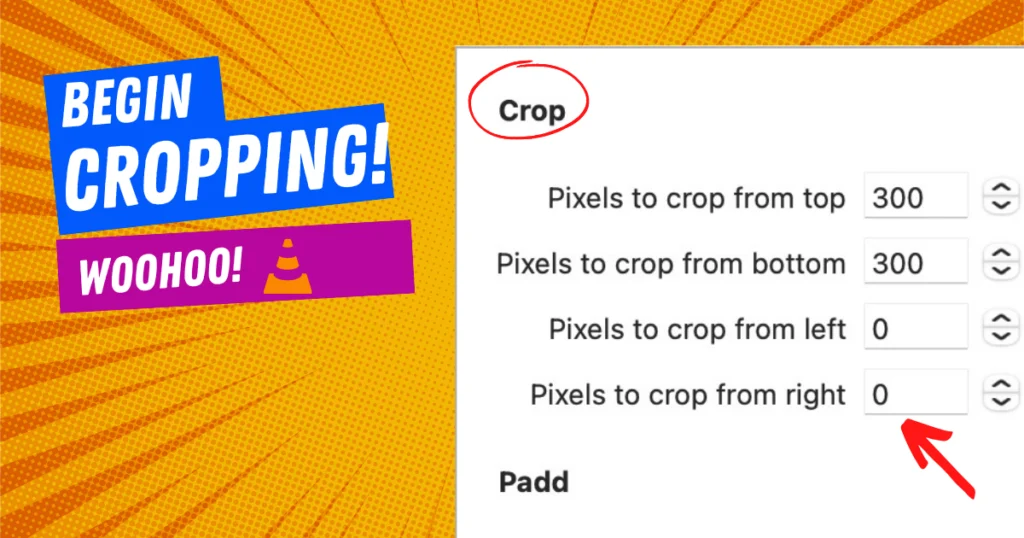
Determine what areas of the videos you’d like to crop.You can select and choose the exact pixel amount (px) based on what area of the video you want to crop out and resize in VLC. Your options are top, bottom, left, and right.
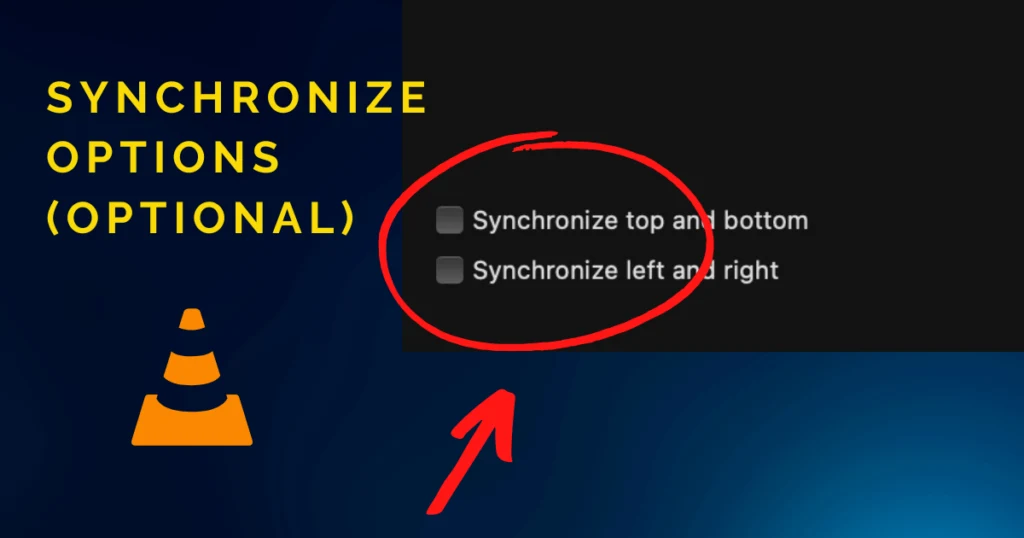
Tip: There are also synchronized crop options at the bottom of the screen, which make editing two sides simultaneously, easy, and instantaneous.
This crops & saves the video for VLC viewing only. A separate process is required if you wish to crop & save the video permanently (for use in different software or media players). This process varies depending on whether you are using a Mac or Windows computer.
Related: VLC Media Player: Is it still the Best Video Player?
Saving a cropped video in VLC on Windows
Note: If you want to crop the video, but don’t desire to save it, then you can access the temporary VLC crop dashboard via the video effects screen.
Simply hold Ctrl+E or through the ‘tools’ dropdown menu at the top of the screen.
Below we’ll explain how to permanently save a video you cropped in VLC on Windows.
Step 1. Open preference (Ctrl + P) and toggle ‘show settings’ from ‘simple’ to ‘All’
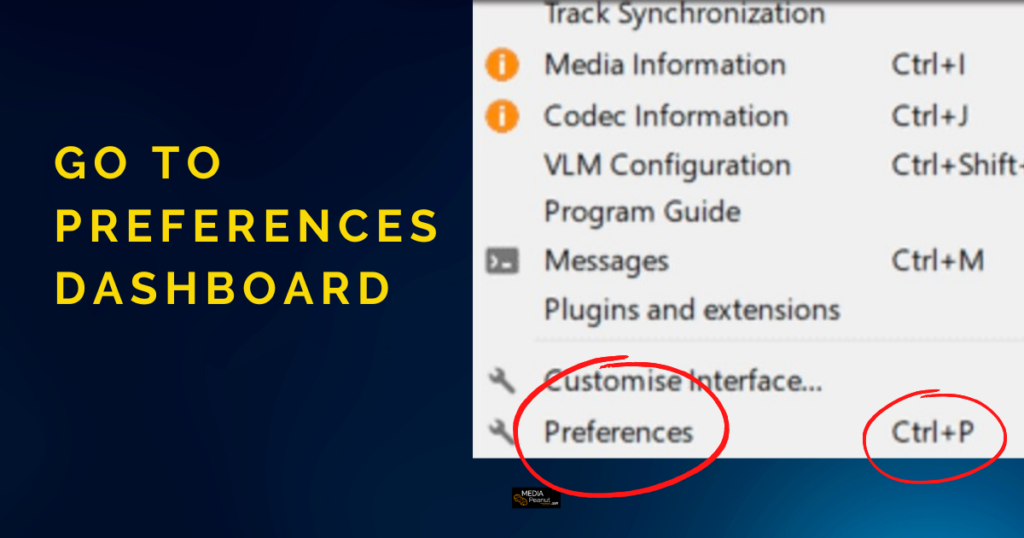
The shortcut to open this screen on Windows Ctrl + P – this will take you to the advanced preferences tab. This way you won’t have to search for it.
Alternatively, you can navigate to preferences by clicking on the Tools tab at the top of the menu on Windows.
At this point, you’ll need to toggle ‘show settings’ to all:
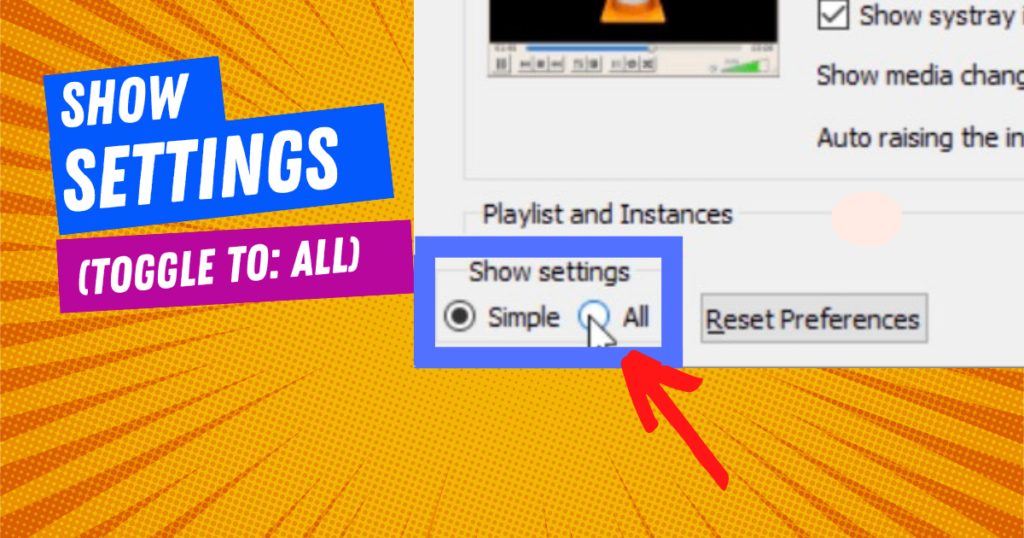
You will see numerous options once you access the preferences tab. You’ll need to locate the CropAdd screen as explained in the next step.
Step 2. Select ‘Videos’ > Filter > CropAdd to prepare the saved crop file
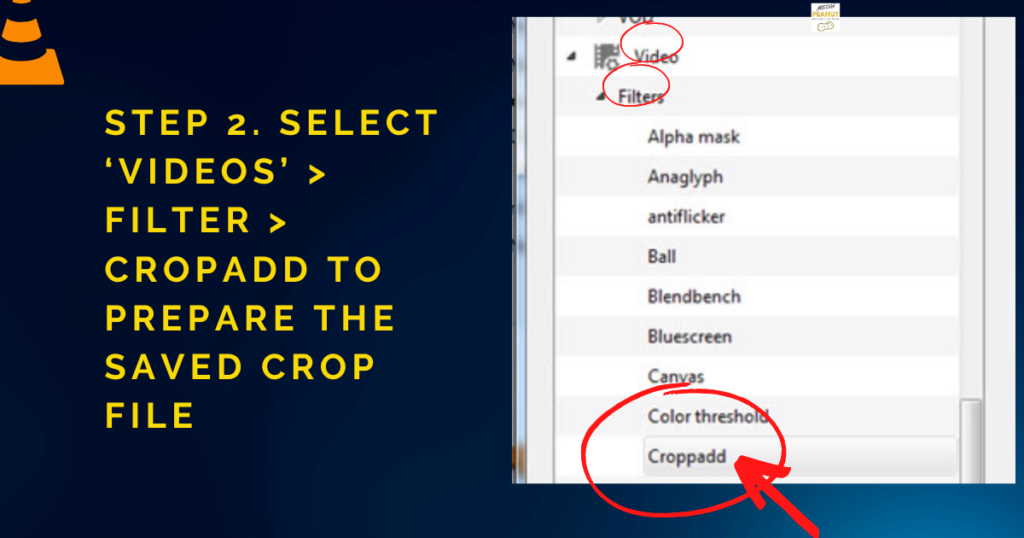
You can find Cropadd at the bottom of the list when you select the video tab under filters on the left side of the screen.
To prepare the save for the cropped video, follow these steps: first, go to preferences, then videos, and then filters. Look for Cropadd at the bottom of the list.

It’s important to note that (if you want to save it as a separate permanent file), then you should set your desired crop pixels, but not not hit the save button until completing the next step.
Step 3. Save your Cropped video by selecting ‘Filters’ > video scaling filter > Save
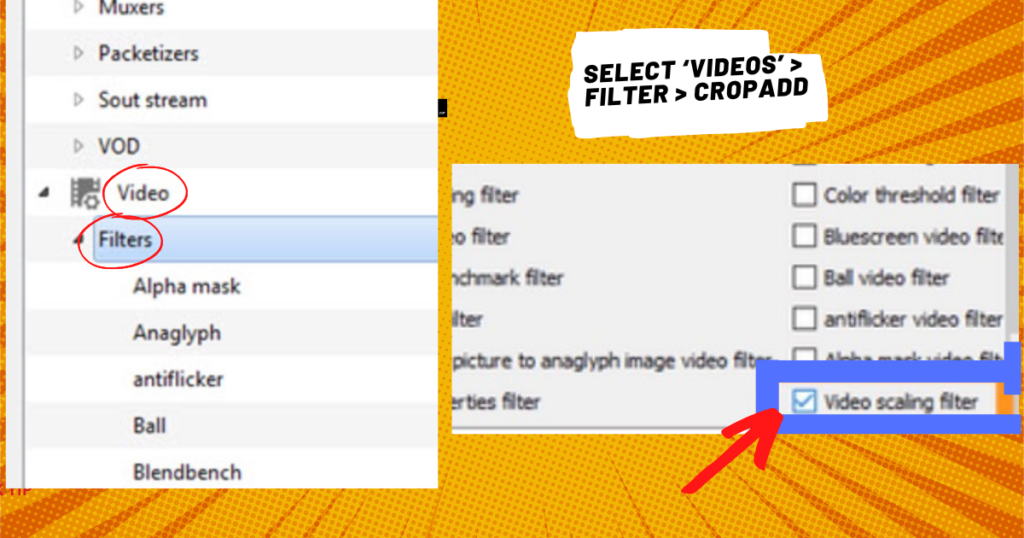
Locating the video scaling filter option can be challenging due to the abundance of options available, so take your time here.
You can find the video scaling filter feature (lets you save), which allows you to save a cropped video, by selecting the “Filters” tab with no submenu highlighted.
On the right side of the screen, the video crop feature is listed as the second-to-last option. In summary, select the “filters” tab and visually search for the video cropping feature to find it.
How to crop a video in VLC on Mac
We’ll cover how to crop a video in VLC on Mac below. You can use this on any Mac OS device, including MacBook Air and MacBook Pro models.
Step 1: Launch VLC and hold CMD + O (or Open file)
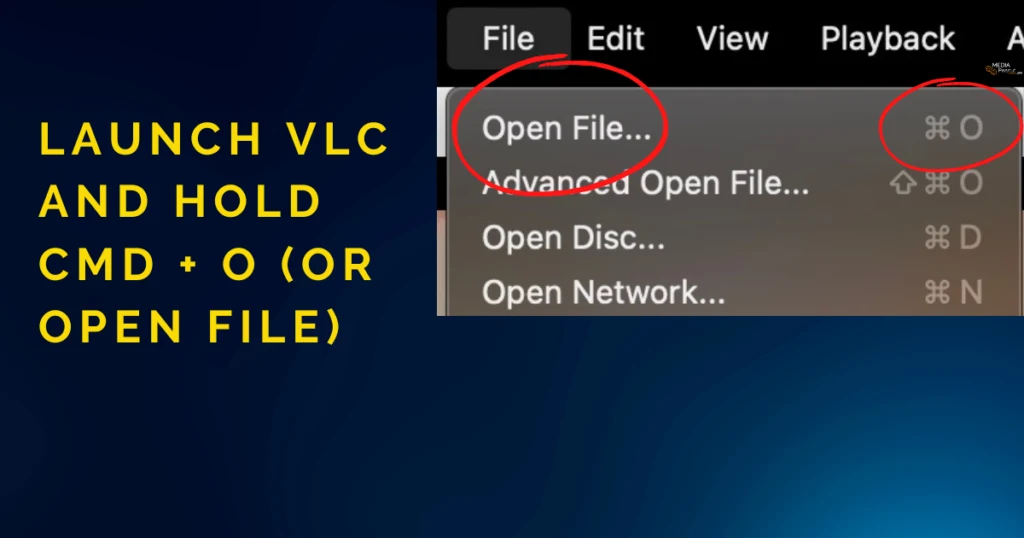
As soon as you open the video, you can take a visual estimate of what you want to crop. The top right area of the video might need to be removed or maybe you want to cut off both left and right sides for the video to make it more narrow.
As mentioned earlier, it’s important to note that by using this method you’ll remove the pixels outside the cropped area. The video will not be rotated or flipped in VLC when cropping nor will it trim or cut the length of videos in VLC.
Step 2: Open the Effects and filters dashboard by pressing CMD + E (or via the Windows menu)
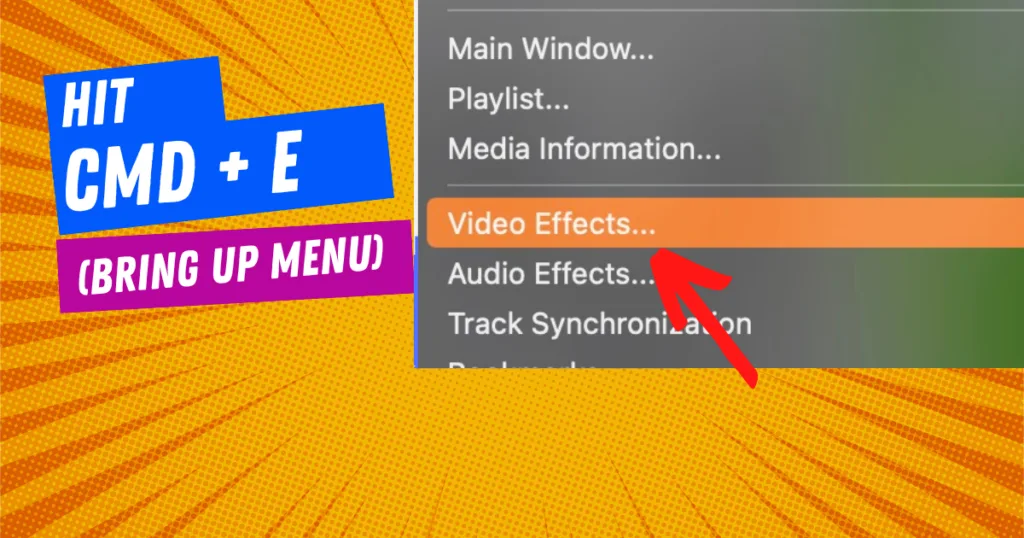
A dashboard with different tabs can be found in the effects and filters dashboard. The video effects tab is the first tab you’ll see, and the crop tab is the second tab from the left.
Choose this to access VLC’s crop menu. This part of the process is very similar on windows as we mentioned previously in this guide.
Related: How to Speed up (or Slow Down) Videos in VLC
Step 3: Select crop and select the amount of pixels you want to crop out
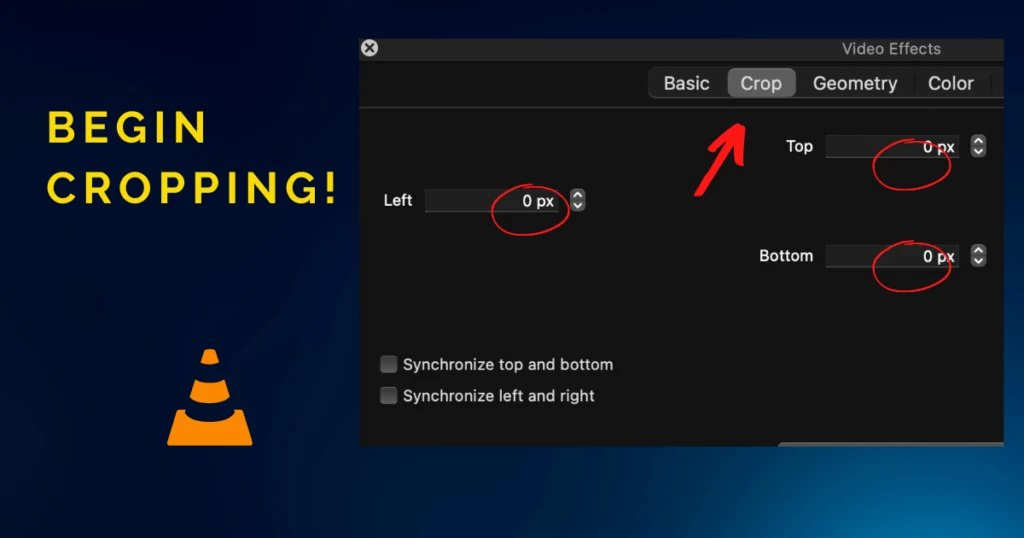
On this screen, you can determine exactly which areas of the video you want to crop remove, for example bottom left or top right. Typically, 150 pixels is a good place to start with cropping a video to begin the estimation process.
You will be required to use a custom range of pixels here. You can use a crop preview that will occur in real time on the video you launched by pressing Ctrl+E.
This means you can see exactly where you’re cropping and how much right within the VLC media player.
Saving a cropped video in VLC on Mac
Below we’ll explain how to permanently save a video you cropped in VLC on Mac.
Step 1: Open settings by locating VLC > settings, then click ‘show all’ at the bottom left of the screen
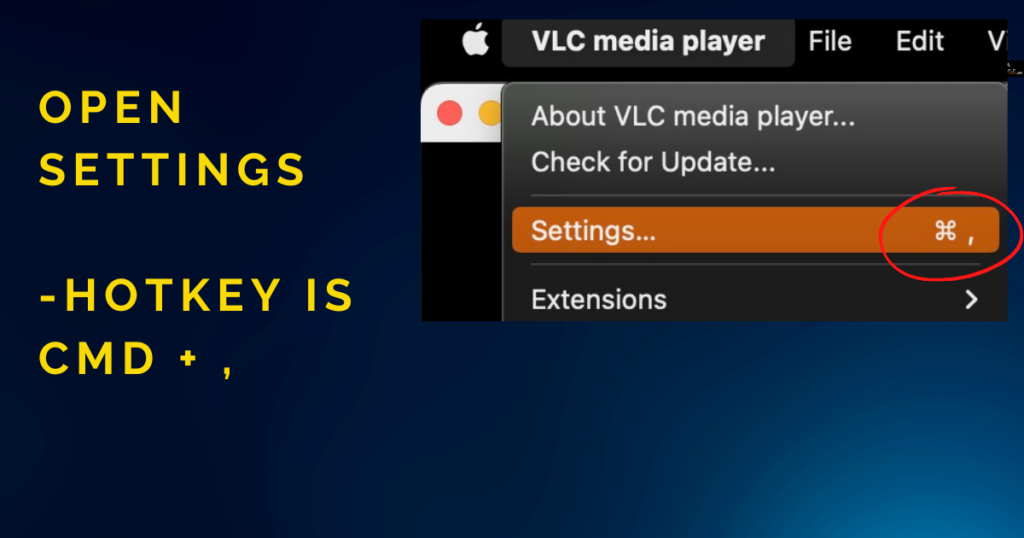
The shortcut to accessing this screen is by pressing CMD + , (a comma) and this will bring you to the preferences tab – you won’t have to search for it. Or navigate to preferences by clicking on the VLC tab at the top of the menu on mac.
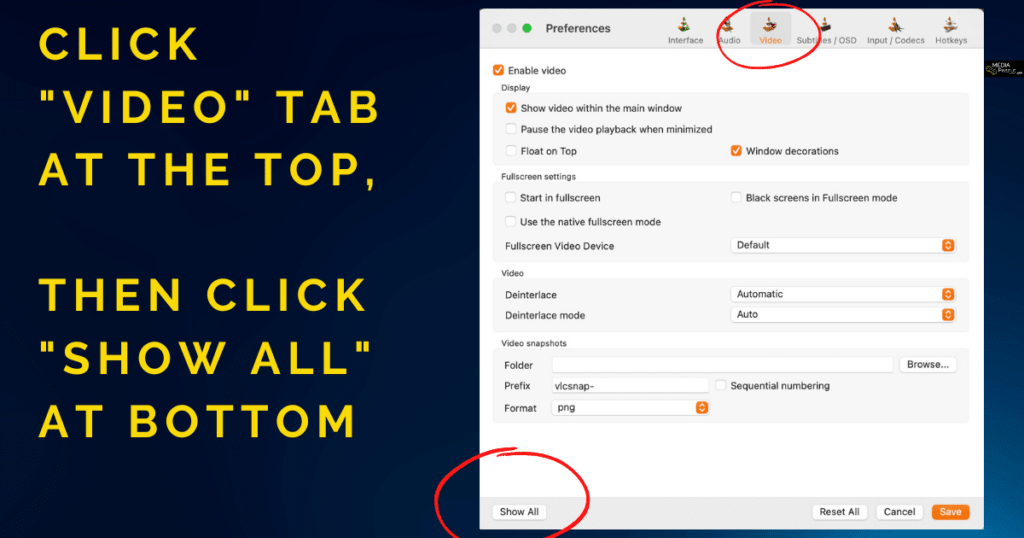
After click “show all”, you’ll be presented with a dashboard with an abundance of options, don’t be overwhelmed – all you have to do is look for the video filter as i’ll explain in the next step.
Step 2. Prepare your Cropped video for saving via Videos > Filters > CropAdd
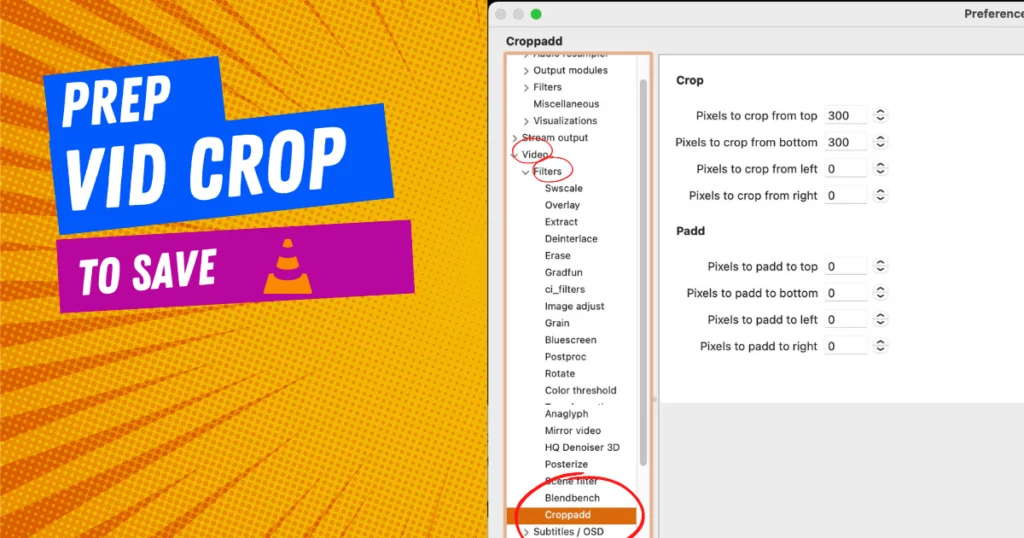
You’ll need to reach the crop add tab.
This pertains to saving the cropped video. Remember, first go to preferences, then go to videos, then filters, then find the crop add at the bottom of the list.
IMPORTANT: Set your desired crop pixels, but do not hit save yet. Stay in the dashboard and move to the next step.
Step 3: To save the cropped video on Mac Go to Video cropping filter under Videos > Filters > Video cropping feature
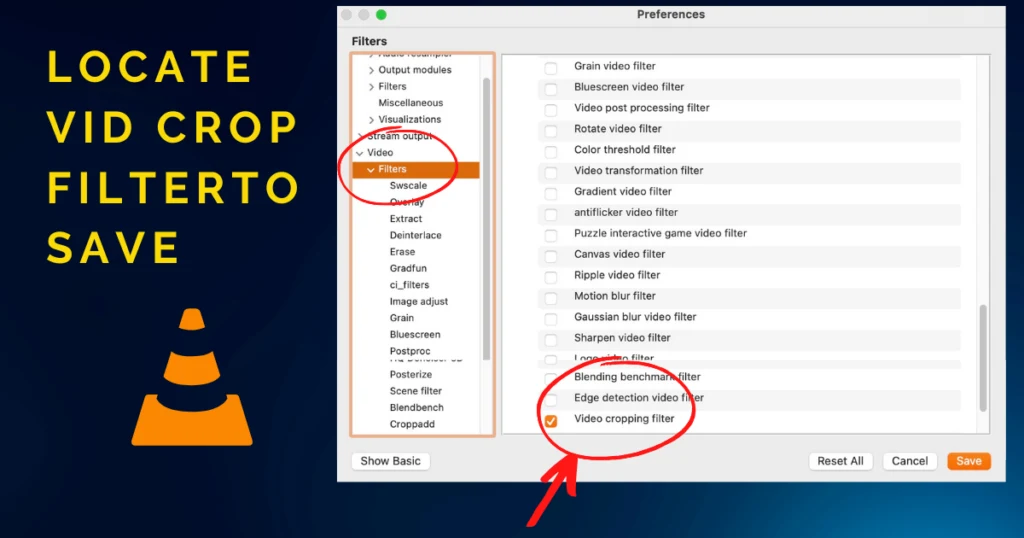
This is where things get tricky because finding the menu can be difficult since there’s so many options.
You can find the video cropping feature (which lets you save a cropped video) by selecting the “Filters” tab without any submenu highlighted. (See photo)
On the right side of the screen, the video crop feature is the second-to-last option on the list.
In short, highlight the ‘filters’ tab and visually look for this cropped video saving feature.
What folder does a cropped video in VLC save to on Windows?
Where does a cropped video in VLC save to on Windows? The cropped video should save to the destination file you have specified, but if there is no option on your version of VLC to save on the destination file, you may want to try opening the original video.
The only alternative is to choose from a selection of more powerful media players with editing capabilities… or simply use a web based app to crop the video.
Where does a cropped video in VLC save to on Mac?
You should be able to save the cropped video to the destination file, but if that option is not available in your version of VLC, you may want to try opening the video (same file name) from its original location first.
Alternatively, you can use a web-based app to crop the video or select a more advanced media player with editing capabilities.
How to accurately estimate how many pixels to crop from a video in VLC
You can preview and then increase or decrease until you find what you want. If you’re on Mac, a powerful crop hack for VLC is to hold CMD + Shift + 5 (Screen capture) and then move the corners of the dotted line square to estimate videos, then exit out of screen capture and go back to VLC.
Users can even save a profile at the bottom so every video your video remains cropped when opened. You can also reset your crop options from the Cropadd screen using the button at the bottom.
Can you Crop video using VLC on iPhone, android
Can you rotate video using VLC on iPhone, android
The VLC media player apps on iPhone and android devices does not allow you to crop the video the same way it’s desktop software allows for. On iOS devices and android-based phones/tablets, you’ll need to use the default video editing or another custom cropping mobile based app or tool.
On iPhone, you can select a video within the photo album. It is saved in and then at the top, right select edit, then crop, then rotate.
From here, you can also rotate various custom angles. This means you’re not limited to just the standard flip, horizontal, 90°, and 180° options.
Can you crop a video with Audio in VLC?
Yes, you can crop a video with audio in VLC. When you crop a video, the audio gets cropped accordingly. You can also extract the audio separately and re-sync it with the cropped video.
On Windows
- Launch the VLC Media Player and open the video file you wish to crop by clicking on “Media” in the TOP menu bar and selecting “Open File.”
- In the menu bar, select “Tools” > “Effects and Filters” > “Video Effects” > “Crop.” Now, enter the values in pixels in the top, bottom, left and right fields to specify the area you wish to crop out.
- Press “Enter” to apply the crop and change the values to get the desired result. Note down the final values on a paper, or simply paste them in an editor on your device which you’ll use later while saving the video.
- From the menu bar, select “Tools” > “Preferences.” In the “Interface Settings”, enable the radio button labelled as “All” under “Show Settings.” Navigate to “Video” > “Filters” > “Cropadd.” In the “Cropadd” dialogue box, enter the values you had noted.
- Now, click on the “Filters” setting and enable the setting labelled as “Video scaling filter” and hit the “Save” button.
- From the home screen, click on “Media” > “Convert/Save” and drag and drop the cropped video in the “File” field. Select “Convert” after clicking on “Convert/Save” and then select “Edit Selected Profile” > “Video Codec.”
- Navigate to the “Filters” tab and enable the “Video cropping filter” and hit “Save.” Pick where you wish to save your cropped video in the “Destination file” box and hit “Start.”
On Mac
- Launch the VLC Media Player. Click on “File” in the menu bar and select “Open File.” Browser and open the video from your device.
- In the menu bar, click on “Window” > “Video Effects” > “Crop.” Now, enter the values in pixels in the top, bottom, left and right fields to specify the area you wish to crop out.
- Press “Enter” to apply the crop and change the values to get the desired crop. Note down the final values on a paper.
- From the mac menu bar, select “VLC” > “Preferences.” Click on the “Show All” button in the bottom-left corner of the dialogue box. Navigate to “Video” > “Filters” > “Cropadd.” In the “Cropadd” dialogue box, enter the values you had noted.
- Now, click on the “Filters” setting and enable the setting labelled as “Video cropping filter.”
- From the home screen, click on “File” > “Convert/Stream.” In the “Open Media” dialogue box, click on “Add” to open the video file. Under “Choose Profile”, select “Customize” and tap on the “Video Codec” tab. Enter the value and hit “Apply.”
- Pick where you wish to save your cropped video by clicking on “Save File.”
How to convert a video to another video format after you convert it?
VLC lets you convert many video formats and codecs to another format with just a few clicks. For example, you can convert an AVI file to an MP4.
On Windows
- Launch the VLC Media Player and from the menu bar, select “Media” > “Convert/Save.”
- From the “File” tab in the “Open Media” dialogue box, click on “Add” to open the video file you wish to convert.
- Press “Convert/Save” at the bottom of the dialogue box. Enable the “Convert” radio button. Either proceed with the default profile or click on the wrench icon to create a custom profile based on your requirement. Under the “Audio Codec tab,” select “Keep original audio track,” and click “Save.”
- Name your file and select the destination where you wish to save it. Now, click on “Start” to convert.
You’ll see a file conversion timer showing the status of the conversion.
On Mac
- Launch the VLC Media Player and from the menu bar, select “File” > “Convert/Stream.”
- Click on “Open Media” to add the video file you wish to convert.
- Under “Choose Profile”, select “customize” to create a custom profile based on your requirement. Under the “Audio Codec tab,” select “Keep original audio track” and hit “Apply.”
- Pick where you wish to save your cropped video by clicking on “Save File.”
VLC has some default formats and containers across which it supports video conversions smoothly:
| Video Format | File Container |
|---|---|
| H.264 | MP4 |
| H.264 | TS |
| Dirac | TS |
| MPEG | TS |
| Theora | OGG |
| WMV | ASF |
| DIV3 | ASF |
| MPEG 1080p/720p | MP4 |
| DivX | AVI |
| SD & HD video format (for iPod) | MP4 |
| iPhone/PSP | N/A |
| SD low and high video format | MP4 |
| for Android | N/A |
| VP89 Video File | WBEM |
Alternate ways to Crop a video instead of using VLC
Below are some alternate ways to crop a video instead of using VLC:
1. Use an online video editor such as Clipchamp or Kapwing. These tools let you upload your video, trim it, and save the edited version back to your device in different formats.
2. Use a desktop-based editor like Adobe Premiere Pro or Final Cut Pro. These are more powerful and feature
Clideo: Web-Based App

Clideo is an online video editing tool you can use for cropping your videos. Being a web-based tool, you don’t need to download it on your Windows/Mac device. It supports a wide range of video formats, including AVI, MPG, MP4, MOV, WMV, and more.
Follow the steps to crop a video using Clideo:
- First, visit the Clideo website and upload your video.
- Now, drag the handles of the cropping window to select the area you want to crop, or pick from a variety of predefined aspect ratios.
- Once you’re happy with your selection, click “Export” to download the cropped video.
Handbrake
Handbrake is a free, open-source video conversion software that allows users to edit and convert videos on both Mac & Windows. It offers a range of video editing features, including cropping, resizing, encoding, and transcoding videos.
With Handbrake you get more advanced options than VLC Media Player.
For instance, Handbrake allows you to crop videos to remove unwanted parts, resize videos to fit specific resolutions, and adjust video quality settings to achieve the desired output. It also offers a range of preset configurations that can encode videos for different devices or platforms.
While VLC Media Player is available for Mac, Windows, Android, and iPhone platforms and supports a range of input formats, Handbrake doesn’t offer a solution for Android and iPhone and only supports videos from DVD and Blu-ray sources.
Handbrake offers only three exporting formats: MP4, MKV, and WBEM, whereas VLC allows users to export files in many formats like MP4, MOV, MKV, MP3, FLAC, and more.
To crop a video using Handbrake, follow these steps:
- Launch Handbrake on your computer and select the “Source Selection” section. Click on the Folder button for a batch scan, or choose the File tab to edit a single video.
- The software will automatically crop black bars from the video but you can manually crop the video by selecting the “Dimensions” tab, clicking on “Custom” under the “Orientation and Cropping” section, and adding the preferred dimensions.
- Navigate to the bottom of the interface and select the “Save As” tab to pick the location to save the edited video. Click on the “Start Encode” tab to start the cropping process. Once the encoding is complete, you can find the cropped video in the selected folder.
QuickTime (Default Mac player)

QuickTime is a multimedia player and framework for Mac users only. It supports many multimedia files, such as audio, video, and images.
The QuickTime Player is a basic version that comes pre-installed on Mac computers and can play multimedia files. To access more advanced features, such as cropping video, download QuickTime Pro.
To crop a video using QuickTime Pro, follow these steps:
- Open the video you want to crop via QuickTime Player and then go to “Edit” > “Copy” to capture a frame of the video and export it in JPG format.
- Open an image editing tool like Photoshop and import the exported image. Use the Rectangular Marquee Tool to select the area you wish to keep, and fill it with black, and others with white as a mask. Save it as a GIF or TIFF.
- In QuickTime Pro, go to “Window” > “Show Movie Properties” > “Visual Settings” and apply the mask file.
- Once you’ve finished cropping the video, go to “File” > “Export” to save the cropped video to your desired location.
it is significantly easier to crop a video using QuickTime hot keys, then it is using VLC media player. It is also free and native to most Apple MacBook Pro & MacBook Air laptops.
Related: The 7 Best MacBooks for Photoshop & Photo Editing
Windows Movie Maker (Windows App)
Windows Movie Maker is a video editing program for Windows users. The software offers a range of editing tools, including cropping, trimming, and adding transitions and effects.
It is easy to use and features an intuitive interface, making it accessible to even the most newbie users.
To crop a video in Windows Movie Maker,
- Import the video, clip it on the Main Track, and enter crop mode.
- From there, adjust the size of the yellow square frame to the desired dimensions, either by dragging the solid line angles or inputting the length and width.
- Once you’ve made your adjustments, click “Return” to apply the new size and return to the primary interface.
Final Cut Pro
Final Cut Pro is a professional video editing software that offers a wide range of features for video editing, including color grading, motion graphics, audio mixing, and much more.
Final Cut Pro offers precise cropping tools, allowing you to crop videos to any desired aspect ratio or size without losing the quality of the video or audio.
To crop a video using Final Cut Pro, follow these steps:
- Launch Final Cut Pro and click on “Import Media” to open the video file you wish to crop.
- Grant permission to the software to access the file on your Mac by clicking on “OK.” Browse and import the video file by selecting it and clicking on “Import Selected.”
- Create a new project by naming it and clicking on “OK.” Select your clip on the timeline and click on the “Transform” icon in the bottom-left corner of the viewer. Click on the “Crop” option.
- You’ll see three more options. Click on “Crop” again. Drag the blue handles at the corners of the crop window or reposition the window to your liking.
- Click on the “Done” button on the right side of the screen.
Adobe Premier Pro
Adobe Premiere Pro is a professional video editing software that is widely used by content creators, filmmakers, and video editors, which is available for Windows and macOS.
Adobe Premiere Pro provides advanced video editing tools, including timeline-based editing, color correction, audio mixing, and much more. It also has a range of features that make it a great video cropping tool.
With Adobe Premiere Pro, you can easily crop a video using the following steps:
- Launch Adobe Premiere Pro and import the video file you wish to crop. To import a video, go to “File” > Import or use the shortcut “Ctrl + I” (Windows) or ‘Command + I” (macOS).
- Select the clip from the timeline and navigate to the “Effects” panel, then “Video Effects” > “Transform” and double-click on “Crop.” This will apply the crop effect to the selected clip.
- On the left side of your screen, you will see the “Effects Control” window. Drag the handles to crop your video and enter values in the top, right, left, and bottom boxes to find the perfect cropping area. You can also use the crop tool in the preview window to adjust the crop visually.
Adobe Premiere Pro also provides various customization options for cropping, such as the ability to animate the crop effect, add feathering, or use keyframes to change the crop area.
Wondershare filmora

Wondershare Filmora is a video editing software used to create professional-looking videos. It is available for both Windows and macOS and offers a user-friendly interface and extensive range of video editing features.
Using the video crop tool in Wondershare Filmora, you can easily crop videos to remove unwanted parts, change aspect ratios, or improve composition.
To crop a video using the software:
- Import the video file by either clicking “Import” or by dragging and dropping files to the User’s album. This will add the video to the media library of the software.
- Drag videos from the User’s Album to the video track on the Timeline and right-click the video. Click on the “Crop and Zoom” button on the menu. This will open up the Crop and Zoom window.
- Click on “Custom” to crop the video to any aspect ratio of your liking, or simply select from the options like 16:9, 4:3, or 1:1 aspect ratio. If you select a ratio, select a corresponding aspect ratio when exporting. Use the drag handles on the video to adjust the crop area.
- Once you are happy with the crop area, click “Export” to save your cropped video. You can choose from a range of export options, such as file format, resolution, and quality.
Differences between cropping videos on Mac vs. PC versions of VLC?
Cropping videos using VLC is similar on both Mac and PC versions of the software. The major difference is in how you access the cropping window.
On a Mac, you can access the window by clicking on “Window” > “Video Effects” > “Crop” from the menu bar, while on a PC, you need to click on “Tools” > “Effects and Filters” > “Video Effects” > “Crop” from the menu bar.
Also see: 9 Best Tablets for Zoom Calls & Video Calling
Can you Screen shot in VLC?
To take a screenshot in VLC, you need to first open the video you want to capture. Then, navigate to the specific scene that you want to capture and use VLC’s frame-by-frame feature to access the exact frame. Once you have the desired frame, you can capture the screenshot by pressing Shift+S (for Windows and Linux) or Command+Alt+S (for Mac). This will save the screenshot in the default location on your computer.
VLC also allows you to record your screen via the screen recording feature. This is useful for capturing video footage or creating tutorials, and can be accessed by going to the “View” menu and selecting “Advanced Controls”. After you enable this you can start (and stop) the recording by clicking on the buttons that appear in the player’s control panel.
FAQ
Why would you need to crop a video in VLC?
Cropping a video in VLC allows you to remove unwanted elements, highlight a specific area, change the aspect ratio, and improve the composition based on your preferences. It’s feature in VLC is mainly useful for simple video cropping and can be used to create a more visually appealing video.
By removing unnecessary elements and focusing on the essential content, you can make the video suited to you or your audience’s needs.
Why is permanently saving a cropped video a different process than temporarily cropping in VLC?
Since VLC media player wasn’t designed with editing as its primary focus, cropping a video takes a significant amount more steps than many other softwares. Its also free and open sourced – another reason VLC didn’t emphasize cropping as a primary feature, and chose it to be a secondary.
What is the difference between cropping, trimming and rotating in VLC?
In VLC media player, cropping, trimming, and rotating are three different video editing techniques. The steps differ based on whether you’re using VLC on a computer running Windows or Mac.
Cropping removes unwanted parts of a video, trimming cuts the beginning or end of a video to create a shorter clip, and rotating changes the orientation of a video.
How do I Crop and save in VLC?
To crop a video in VLC media player, you need to open the player and the video file. Then, access the “Crop” feature from the “Tools” or “Window” menu, depending on whether you’re on Windows or Mac. Enter the desired pixel values to crop the unnecessary area and note down the final values.
Next, enable the “Video cropping filter” under “Filters” in the player’s preferences and apply the cropping values. Finally, save the cropped video using the “Convert/Save” or “Convert/Stream” option in the player’s home screen.
VLC video cropping from bottom also crops from the left?
When cropping a video from the bottom in VLC, may also crop from the left. This can happen when the values in the top, bottom, left, and right boxes in the “Crop” window are not set correctly.
To address this problem, update to the latest version of the VLC Media Player. This ensures that any bugs or glitches in the older version are resolved.
Once updated, navigate to the “Crop” window and ensure the values in the top, bottom, left, and right boxes are all set to zero pixels. This should resolve the video being cropped from the left when only cropping from the bottom.
Can I resize the cropping frame while cropping the video?
Yes, you can resize the cropping frame while cropping a video in VLC.
In the “Crop” window, enter the dimensions for the frame in pixels. This will resize the frame to your liking, allowing you to crop the video to the exact size and shape that you want.
By adjusting the top, bottom, left, and right values in the crop window, you can also reposition the frame to select the part of the video you want to keep.
What formats can I save a cropped video as in VLC?
In VLC, you can save a cropped video in a variety of formats, including MP4, MOV, AVI, FLV, and more. The format options depend on the version of VLC you are using.
Once you have cropped the video, you can use the “Convert/Save” option under the “Media” menu to save the video in your desired format.
Does cropping a video reduce the file size of a video?
Cropping a video can reduce the file size of a video to some extent, but the impact on file size depends on how much of the video is being cropped out.
Cropping out a small portion of the video may not significantly reduce the file size, whereas cropping out a larger portion can lead to a more significant reduction.
What other editing options are available after cropping a video in VLC?
After cropping a video in VLC, there are many other editing options available.
Some of these options include cutting the video, adjusting the hue, brightness, contrast, and saturation. You can also sharpen the video, remove banding and film grain, rotate the video, add logos and text, apply anti-flickering, motion blur, spatial blur, and clone.
VLC allows for color extraction, thresholding, negating colors, posterizing, applying gradients, and sepia effects. You can also rotate the video by 90/180/270 degrees, flip it horizontally or vertically, apply transposition and anti-transposition effects, and apply anaglyph 3D, mirror, water effect, and wave effects.
Can you manually crop videos in VLC?
VLC allows you to manually crop videos by adjusting the dimensions of the cropping window. You can enter specific values for the top, bottom, left, and right dimensions of the window to resize to your desired size and shape.
Can you crop 3d videos and 4k videos in VLC?
VLC media player may sometimes allow cropping of 3-D videos or 4K videos, but some users may experience issues. This is because VLC media player is an open-source, free media player that is not primarily meant for video editing purposes.
For advanced video editing it is strongly advised to use a more specialized and advanced video editing software. For example, Final Cut Pro or Adobe Premiere Pro could be tested. These premium media player tools offer more advanced and precise features for cropping and editing 3-D or 4K videos, as well as other advanced video editing capabilities.


